QUESTIONS I HAD ABOUT THE AKEDA DOVETAIL JIG
(with the answers I've found from using it)
1 How easy is it to postion and clamp the parts to be cut?
2 How easy is it to set the joint spacing - and keep them there - exactly?
4 How does the bit follow the dovetail jig's dovetail guides?
5 What about stock thickness and dovetail bit angles?
6 What's the minimum stock width I can dovetail with the AKEDA?
7 Is the "No Test Cuts Necessary" thing true - or just more advertising hype?
8 What about those "plastic" snap in guides? Will they hold up over the years?
9 With all the dovetail jigs on the market TODAY - would you still get the AKEDA?
10 Got any gripes and if so, what are they?
11 Tips and Suggestions from others
1. How easy is it to postion and clamp the parts to be cut?
For vertical parts, you register the left or right side of the part against a 2" tall, vertical, face, square to the top of the jig. This is critical. If the part is cocked, even just a little, you won't end up with tight fitting dovetails. It's also important that the stock be properly prepared - flat parallel faces, flat, straight, parallel edges, all corners square.
The AKEDA has a unique - one hand method of clamping the part . Using a special provided nob, you merely inserted it into either end of the clamping mechanism and turn it. And internal "chain and sprocket"- it's actually a "toothed" belt and sprockets - mechanism causes both sprockets to turn at the same time and at the same rate. The clamp jaw will move PARALLEL to the face of the stock - no chance of having one side tighter than the other - and perhaps cocking the part. THAT leaves you with a free hand - to hold the part in postion while you tighten the clamp.
Now consider how "the other jigs" clamp the part in place. You have to tighten BOTH sides of the clamp independently - or flip TWO cam levers after you got them "close". OK - one hand for the right cam lever, one hand for the left cam lever - and one hand to hold the part in position while you operate the TWO cam levers. Now you're saying to yourself "One hand for the right cam lever, one for the left cam lever - and - another hand to hold the part. HUH!?"
OK - so you can snug things up - one at a time - then flip the cam levers one at a time - leaving one hand free to hold the part in place. I don't know about you, but I have trouble moving something so it stays parallel when I'm moving one end at a time. That means when I flip the cam levers, one end of the part may be clamped tighter than the other - or worse yet - one end tight and the other one loose. It's inconvenient as hell when you discover that the part moved - while your were routing it! There ain't no Do Over or UNDO key if somethingslops and a part is cut wrong - you just have to make a new part and try again. Anything the jig can do to reduce known sources of error the better, and the AKEDA does a better job of that than the other jigs.
This"clamping thing" is a subtle little thing when you read the instructions. It AIN'T subtle and it IS a BIG DEAL when you actually start USING the jig.
Did I mention that the clamp face has sand paper on it to improve the grip so you don't have to rely on heavy clamping pressure? Again - subtle little things that indicate how well thought out this jig is. Kevan, the inventor of the jig, really thought through the design of this jig. Not focusing JUST on the method of guiding a router bit, and adding on other stuff later as problems were found, but BEFORE, foreseeing weaknesses in a design idea and changing the design to eliminate or at least minimize them to an acceptable level.
What you get is an integrated system for routing dovetails (and finger/box joints - and sliding dovetail joints), NOT a jig that "sort of works" and then gets Add Ons to solve problems overlooked in the initial design. No Windows, Windows 2.0, Windows 3.0, Windows 95 and Windows 98, Windows XT, Windows NT, XP and then Vista. You start out with a fully loaded, well designed and built, easy to use dovetail cutting system - all the parts designed well, integrated even better - AND easier to use.
2. How easy is it to set the joint spacing - and keep them there - exactly?
The second part first. How do you keep the guides exactly where you place them?
The "finger guides" are "snap ins" - put them where you want them - and snap them in place. They'll only "snap in" in discrete 1/8th inch increments. Once snapped in place they CAN"T MOVE 'til YOU unsnap them - no slipping or cocking - they CAN'T MOVE. There are NO allen head set screws to try and tighten in confined spaces - without moving anything as you tighten them. And if you don't tighten them enough - you KNOW they're probably going to move - while you're routing. Doesn't take much movement of just one guide to screw up a perfect dovetailed joint.
BTW - there's no allen head wrench to lose. Things that drop on the shop floor have a nasty habit of ending up under the heaviest thing in the shop - next to something that bites, stings, stinks or all three. Allen wrenches are particularly good at this little trick.
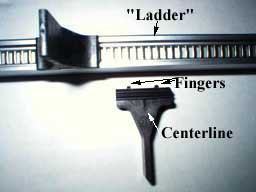
Once you've decided on the Angle (7, 9, 11, 14 or 20 degrees) and the number of tails you want you get out the tail and pin guides after you've you place your board in the jig and secure it with the slick one hand to operate clamp - one horizontal, one vertical - registered against either the left or right side of the jig, and "snap in" your left and right Half Pins fingers.
Now you can eyeball about there the rest of the pins should go - I started with the center pin. Then it's just a matter of positioning the rest of the pins so things look right to your eye. Since the fingers can only "snap in" in discrete 1/8th inch increments (see photo below) you may have your center tail slightly off center one way or the other - or - if you're a details phreak - you can shim off the iig's left or right "fence" to get things perfectly centered - or - cut your parts so the widths work out perfectly (I'm not that crazy about precise centering but it's nice to have options).
3. Because the Pin Guides and Tail Guides are separate, how hard is it to set the "second step" guides to the "first step" guides locations?
On the jigs with Back To Back Guides, this alignment is taken care of by the jig - sort of. Cut one part of the joint, flip the Back To Back Guides over and cut the other (second) part of the joint. As long as ALL of the other FIVE tother possible movements are eliminated the fit of the resulting joint is almost guaranteed (note the use of the word "almost")
Why "almost"? Well an object in space has SIX degrees of freedom of movement.
"SIX!? I thought there were only THREE dimensions - up/down, left/right and in/out. Where'd the other THREE come from?"
You forgot ROTATION, about each of your THREE axis (axises? axes? axi?) Look at the following diagram.
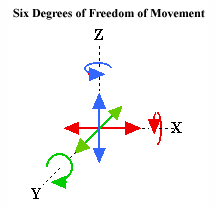
With the "Back To Back, Flip It Over" guides method you want to limit movement to only ONE of the possible SIX movements. If you're standing at "Y", and your guides are on the X axis, you want to rotate ONLY around the X axis - NO OTHER MOVEMENT. Now when you flip that guide, does your jig allow ANY other movement - even if you don't follow the detailed instructions - To The Letter - every time? Is there any slop in the fit of any of the parts that could permit additional movement? Is there ANY way you can screw things up (OK, som I'M the only one with that special gift.)?
Think about it.
Can one end of the template possibly be set higher than the other end ( rotated / tilted around the Y axis)?
Can the top of the guides end up slightly higher or lower than the height they were at before flipping them over AND will they stay there when you place a heavy router on them and actually route out wood (moved up or down on the Z-axis)?
Can the guides be tilted front to back - they will be supporting a router and you will be moving that router in and out, left and right (tiilted /rotated around the X-axis)?
Can the flipped over guides now be closer to you, or farther away - and maybe enough that your router bit doesn't cut the whole socket but just most of it (moved on the Y-axis)?
Can one end of the guides be closer to you than the other (rotated around the Z-axis)?
If the answer to one or more of those questions is YES it can and, following Murphy's Law, WILL, compromise the fit of the joint. Read that again then see how the other dovetail jigs deal with limiting movement.
Now look at how the AKEDA deals with these potential problems and limits the jig to only ONE degree of movement - until the guide is "snapped in" to your desired location. And once they're "snapped in" nothing can move out of alignment - by design.
All but locating the guides along the X-axis is is fixed - by the design of the jig. The ONLY thing YOU have to do is locate, and "snap in" a guide or guides. The ONLY thing YOU HAVE TO PROVIDE is a pencil mark on the jig - and only an approximate, not an EXACT, location - of the previous guide, and "snap in" the second type of guide. Because it will only "snap in" at discrete 1/8th inch spacing, you CANNOT misalign it. Even I can line up two lines within an 1/8th of an inch - even if one of those lines is a hairline - and I wear Tri-Focals! And once it's "snapped in" it'll stay there. AND it's only contact with the router will be with the outside of the router's guide bsuhing/collar - no bottom of the router, no weight of the router to support, front and back - so nothing to move it left/right, up/down, in/out and NO ROTATION - ANYWHERE.
4. How does the bit follow the dovetail jig's dovetail guides?
You have two choices here.
You can have the bit follow the dovetail guides and the router follows the bit
or
Have the router follow the dovetail guides and the bit follows the router.
The bit does the guiding approach uses a special "pattern bit". You've seen "pattern bits". They have a bearing on the end of the bit, or between the cutting part of the bit and the router (They're often called Top Bearing Bits and Bottom Bearing Bits). The "bearings on the end of the bit" bits are easier to make and permit screwing on the bearing - and easily changing or replacing the bearing. The "bearings in the middle" bits are a bit trickier, requiring a "press fit" and some device to do the pressing. They're not as common and readily available as the "Bottom Bearing Bits" - and are more expensive. For a pattern bit to work on a dovetail jig it HAS TO have the bearing between the cutting part of the bit and the router. Dovetail shaped "Top Bearing Bits" aren't nearly as common as Bottom Bearing Bits - so they're quite a bit more expensive.
If you don't have the router bit follow the dovetail guide you're left with using a Guide Bushing mounted in the base of your router. The outside of the short projecting "guide" follows the dovetail guides - and the router and router bit follow the guide bushing.
The AKEDA design REQUIRES a 7/16" (0.438") OUTSIDE Diameter guide. Though only one is provided with the jig - a Porter Cable "standard" guide bushing body diameter - having two comes in real handy. You need to use TWO bits to route dovetails, a dovetail bit for routing the sockets in the tails part and a straight bit to route the sockets in the pins part. Once you get the bit's depth of cut set correctly the LAST thing you want to do is lose it because you have to change bits.
Now someone will say "If you route ALL of the tails parts first, THEN do ALL of the pins parts you don't need the dovetail bit's setting anymore. So why TWO routers and TWO guide bushings?"
There are two major reasons for going with two guide bushings in two routers - one set up with the dovetail bit and one set up with the straight bit - regardless of what router based jig you're using
Reason #1
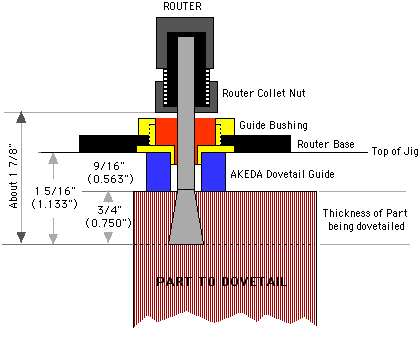
Despite what the advertisements and brochures SAY none of the router based dovetail jigs will cut dovetails WITH NO TEST CUTS - even if the advertisement says the jig has a special depth of cut setting device on it that "eliminates the need for test cuts". Look at the drawing above. Note that the length of the bit between the base of the router and the bottom of the bit inlcudes the thickness of the stock being dovetailed.
Do you think your stock will be exactly the thickness those "special bit setting jigs" are set for, even if you milled it to a specified thickness - when you are going to cut dovetails in them? If your stock is thicker you'll get tighter joints, perhaps too tight. If your stock is thinner, you'll get looser joints, perhaps too loose. You don't want your porridge too hot or too cold - you want it JUST RIGHT. And THAT means some trial and error - with TWO bits. And once you've found the right setting - for each of the TWO bits - you DO NOT want to change the settings.
Reason #2
Getting a bit into its collet - through the guide bushing - and then tightening the collet down can be a ROYAL PITA, especially if you want to minimize the length of the bit sticking out of the router bit collet on your router. You CAN NOT get the bit in the collet, tightern it and THEN set the depth of cut on the dovetail bit - because the dovetail bit's maximum diameters is BIGGER than the opening in the bushing guide. The bit shank HAS TO GO THROUGH THE GUIDE BUSHING from the bottom first and THEN INTO THE COLLET. And then you've got to get at least one wrench on the collet nut, and if you don't have a spindle lock on the router you need to get TWO wrenches in a space that doesn't have much room to work in.
You want to tighten that collet nut (or pair of nuts) down good and tight. Remember, you're using 1/4 inch shank router bits that don't have the collet gripping surface area a 1/2" bit has - AND - the dovetail bit, because of its shape, wants to pull itself out of the collet. And you only want to go through the hassle once for each bit.
NOW do you understand why having TWO guide bushings and TWO routers makes sense?
5. What about stock thickness and dovetail bit angles?
One of the things that makes dovetails - really nicely done dovetails - so appealing is "delicate pins", the thinner the "thin end" of the pins, the more appealing and delicate the joint looks. With handcut dovetails you can make the "thin end" almost a line. NO router based dovetail jig can do THAT because of the minimum practical router bit shank size - which in the US is 1/4", 8mm in Europe. So - if you want the "thin end" of the pins to be as small as possible - 1/4" - then a One Size Fits All dovetail router bit won't do it - for the full range of stock thicknesses 1/4" to 1".
Look at the following diagrams. Note that for the "Other Jig", the One Size Fits All dovetail bit will cut the thinnest "thin end of the pin" only in the thickest stock. As your stock thickness gets thinner, the pin's "thin end" gets thicker. On thin delicate stock - when you want things to really look delicate - the One Size Fits All makes the fattest "thin end" on the pins.
Now look at how AKEDA keeps the "thin end" of the pins at, or close to, the minimum 1/4" dictated by the router bit's shank diameter - FIVE bits, each with a dovetail angle that MINIMIZES the size of the "thin end" of the pins. Really look at the diagram again.
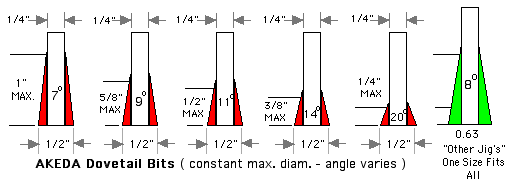
Let's go back to handcut dovetails. With handcut dovetails, your dovetail angle is determned, to a great extent, on whether you're working with "hard wood" or "softwood" - it's a strength of materials thing. For hardwoods the dovetail angle can be pretty shallow - 6 to 8 degrees being in the preferred range. With softwoods you need a bigger dovetail angle for strength - but there is a limit - you don't want to snap off part of a pin - or tail - when the joint is assembled (not an issue with hardwoods - unless you're a cut to about the right size and BEAT TO FIT person). So for "softwoods" the general rule of thumb is to use a dovetail angle of 9 to 14 degrees. When you handcut dovetails, how thin the pin's "thin end" CAN be is determined by the kerf width of the handsaw you use - and that's certainly going to be thinner than the 1/4" dovetail router bit's minimum.
Now look at the AKEDA's dovetail bits (emphasis on plural - bits, not bit) again. Notice that, for each of the common stock thicknesses - 1", 3/4", 5/8", 1/2", 3/8"and 1/4" - there's a dovetail bit that will get you a lot closer to a pin with a "thin end" that's 1/4" than the One Size Fits All dovetail bit will. Handy yes? I keep telling you, this router based variable spacing dovetail jig is REALLY well thought out.
The "Other Jig" has, with their newest version of their jig, addressed this Dovetail Angle - Pin "thin end width" thing by holding the dovetail angle constant and changing the bit's maximum diameter. Though it now provides the multiple router bits option, this approach is exactly opposite of the AKEDA solution. It does have an advantages over the AKEDA solution, which keeps the width of the pin socket constant at 1/2". The "other jig" solution produces proportions that look better on thinner stock. With stock that's 1/2" or thicker the visual differences isn't noticeable.
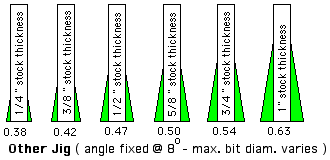
Look at the two router bit diagrams again. Note that the AKEDA's width of the pin sockets is a constant 1/2" while the "other jig's" socket width varies from 3/8" to 5/8" depending of the stock thickness. When you want to figure out things with either math or scaled drawings, the constant 1/2" socket width is easier to work with than varying widths. Not a significant advantage but the difference is merely noted and compared.
Though the differences between the two bit geometries seems to be a Tweedle Dee or Tweedle Dom thing - no big deal right?
WRONG!
Here's why:
1. the shank on both bits is the same diameter - small,
2. the length of the bit sticking out of the router's collet increases as the thickness of the stock increases. The longer that distance is, the easier it is to twist AND flex/bend the bit
3. the torque exerted on the shank of the dovetail bit is proportional to the cutter end's maximum diameter
SO - when you're routing the thickest stock
- with the AKEDA, the maximim diameter of the bit that's cutting is 0.50" ("moment arm" of 0.25")
- with the "other jig", the maximum diameter of the bit that's cutting is 0.63" (moment arm of 0.315")
Why is that significant?
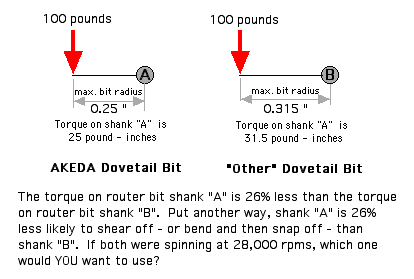
Less torque on the shank of the router bit, the less likely it will shear off or bend.
The more you compare the design of the AKEDA with the "others", the cleared it becomes that the AKEDA designer(s) REALLY thought things through, both from the Ease of Use/Accuracy perspective, as well as from the physics / engineering point of view.
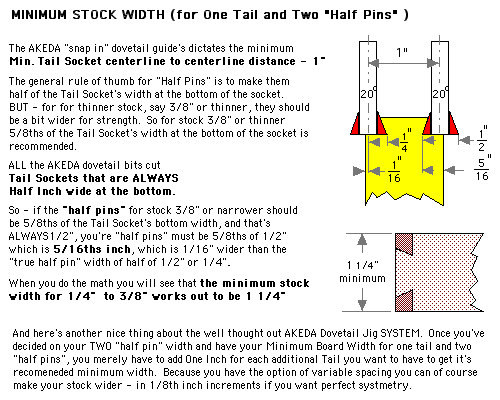
6. What's the minimum stock width I can dovetail with the AKEDA
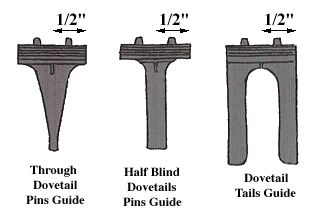
One of the things that makes variable spacing dovetail jigs better than their fixed spacing cousins is more stock width flexability. Your parts' DON'T HAVE TO be dictated by the fixed spacing jig's ridgid demands. You want a jig that is adaptable to YOUR needs, not the other way around. But even variable spacing dovetail jigs have to have a Minimum Spacing - which for the AKEDA is One Inch. Yous saw the pin and tail guide parts illustration earlier but here they are again to illustrate why One Inch
NOW we can get to answering the question - "What's the minimum stock width I can dovetail with the AKEDA?"
7. Is the "No Test Cuts Necessary" thing true - or just more advertising hype?
Well - technically - yes. In REAL LIFE? The answer is NO!
IF, and only if - you're stock is EXACTLY one of the nominal (not alway ACTUAL) sizes - 1/4", 3/8", 1/2", 5/8" and 3/4" - and I'm talking +/- a few THOUSANDTHS - and you set the bit to EXACTLY the distance either specified or provided with a Special Bit Setting Jig - only then is the answer YES. But you and I know that woodworking isn't done in THOUSANDTHS - it is wood we're playing with - and wood changes dimensions due to changes in temperature, humidity and I suspect - the color of the socks you're wearing. I's WOOD!
No Test Cuts? Bullshit!
YOU HAVE TO SET THE BIT HEIGHT TO YOUR STOCK THICKNESS - and that's going to necessitate some test cuts to dial in the perfect fit - unless you are VERY lucky on the first try. And if you have THAT kind of luck you've probably already won the lottery - TWICE - and already own every dovetail jig on the market so you wouldn't be reading any of this stuff.
BUT - because of how and why the AKEDA was designed and built, ALMOST all the other factors that can affect the dovetails fit have been either eliminated or reduced to the point of being insiginificant. And you don't have to read 163 pages of any manual to get good results with this jig.
The weight of the router is supported, front and back, by the top of the jig body, NOT by the pins and tails guides, so it CANNOT TILT - IN ANY DIRECTION
The one hand, parellel clamping system, makes it easy to get your stock where it has to be - and keep it there - under uniform pressure acrossed it - no one side tighter than the other.
The guides only have to be placed close to where they must be and they'll "snap in" to the nearest 1/8th inch setting - no "set PRECISELY to this hairline - then set screw them there and hope nothing moved" potential problems
Once "snapped in" the pin and tail guides STAY PUT - no twisting or rotating and despite the fact that they look like "plastic" - NO bending or flexing or slipping and sliding
With the exception of two other potential sources of error - guide bushing outside diamter and roundness accuracy, and bit centering in the guide bushing - potential problems in ALL guide bushing jigs - ALL the other reasons for doing test cuts are eliminated or reduced to insignificant.
8. About those "plastic" pin and tail guides - how durable are they?
Like anything else, if you abuse something it will damage it eventually, be it metal, "plastic" or one of your vital organs. When you try to snap in a guide other than at the designed 1/8th inch increments it WON'T snap in - even if you try and force it to. BUT - if you really really really really try and force it you CAN damage the guide - and the manual points that out and emphasizes the point. As noted earlier, the designer of the AKEDA knows industrial design - HOW parts can be made and WHAT materials are best suited to making them out of. The "plastic" selected for the guides was chosen because of it's characteristic - those required by their function as part of this jig SYSTEM. And when you think "plstic" think carbon fiber type plastic, not MacDonald's straws kind of plastic.
If you are really worried about a guide being damaged, or a set failing with a lot of use - pick up an extra set of the ones you'll use the most. Sets are around $20. Oh, and you might want to price of the replacement guides for the "other jig".
9. If you had it all to do over again - would you still pick the AKEDA?
If you've gone through all of this information and still don't know the answer to this question - the answer is definitely YES.
10. Got any gripes and if so, what are they?
My gripes are "common to ALL router based dovetail jigs" gripe - and not unique to the AKEDA
Gripe #1
Since all these dovetail jigs use two router bits to make the two parts of the dovetail, the jigs that use a guide bushing to guide the bits should come with TWO guide bushings so each bit could be set up AND LEFT SET UP - for the duration of the dovetailing of all the parts that have the same THICKNESS dimension (see the answer to Question #7 above). Tuning each bit's depth of cut specifically to yourACTUAL stock thickness (not the "Nominal: thicknes) is a PITA trial and error process. Losing a tuned set up to change bits is about the only "challenge" the the AKEDA has. Problem is easy to solve by getting another guide bushing set and having a second router to put it in. But if you've spend the money for a dovetail jig I'm bettng you already had have at least two routers before you went looking for a dovetail jig.
GRIPE #2
Tear out / split out is irritating as hell. Using a "backer board" behind the stock being routed solves one of the problems - blow out / split out/ tear out at the back of the cut - but it's still a minor PITA to have to use a backer board. But when it comes to routing the sockets for the Half Pins, your routing on the EDGE of the TAILS board. A backer board miniimized or eliminates tear out/split out on the back of the board, but does nothing to solve the problem at the edge of the board or the face of the board. There are some things you can do to control the problem though - like scribing the part fairly deeply with a marking knife (or utility knife if you're not one to have specialized tools) - or a sharp wheeled marking gauge - like the Tite-Mark (tm) (that was what is called a Drive By Neener, as in "I've got one of them fancy brass, steel and sharp carbide tools - that's micro-adjustable and costs an arm and a leg"). If a split out starts, it will split at or above the scribe line because you've already cut the grain where it would otherwise continue to split.
Gripe #3
Lots of router bit sticking out of the collet and a small shank diameter. That small diameter, large "reach" means you have to cut slowly, delicately and patiently. You've got the bit in a 2, 2 1/2 or 3 horsepower motor, the parts clamped in place so it CAN'T go anywhere, the dovetail guides will withstand any lateral force you could apply - and you have to tippy toe making each socket cut because of the delicate router bits. To be fair, most jig makers are offering router bits with 8mm shanks, 25% bigger - and stronger - than the 1/4" shank bits - and they're also providing a collar that will fit in a 1/2" router bit collet and hold the bigger 8mm bits. AKEDA offers 8mm shank bits - and the adapter for 1/2 collets.
Gripe #4
With all variable space dovetail jigs there are typically big gaps between the Tails guides that are easy to accidently route between. Because your view of where you're cutting is obscured by the base of the router, it's easy to make this mistake while you're "feeling" where the guide intends you to cut wood. With the older LEIGH dovetail jigs, there was nothing in front of the guide fingers to prevent you from seeing where you're going (though you'd better be wearing eye protection and a dust mask if you get low to see what you're doing). With the AKEDA, the new or retrofit LEIGH jigs and the new Porter Cable OmniJig, you CAN'T get low and see where the guide fingers are.
AKEDA does provide a solution - a "snap in" foot long "filler" blank you can cut up to make custom "fillers" to fill these gaps where you DON'T WANT TO CUT. I don't know if the LEIGH and PC variable space dovetail jigs offer this solution.
About the only AKEDA specific "gripe" I have is the two modes front dust collector window. You install it in one orientation when the wood, when routed, generates dust rather than little toothpick chips. If you forget to change the orientation when the wood will generate "toothpicks" the "toothpicks"aren't all removed by the dust collector well. They can stack up inside the jig and block your viewi of the router bit. The lexan window thing is easy enough to remove and switch orientation. But I seem to always forget until chips start building up inside the jig. I guess a tool designer can't, even if he/she tries really really really hard to make a tool idiot proof, keep this idiot from screwing up. Fortunately for this idiot, the AKEDA doesn't let me do many of the other possible REALLY STUPID THINGS.
11. Tips and Suggestions from others
From Tom B via usenet newsgroup rec.woodworking
Couple of thoughts I didn't see in your write-ups:
A. A coat of wax on the guide rails and the router baseplate works wonders. The router scoots right along afterwards.
I've got some stuff called Waxalit (from Lee Valley) develop to make cast iron tables on saws, joiners and planers slick - and keep stuff like resin and pitch from sticking to it. Will try it first. If that don't work Mother's California Gold car wax will.
B. To help seeing the tail guides, stand up and look over through the back side of the router - the guides are real easy to see from that direction.
Great solution - seeing things from the front gets a bit tricky
"suggestion"
Wish there were some way to get a backer board BEHIND the pin board, but that would completely screw up the geometry. Different set of fingers designed for a 1/4 backer board? Need to give the clamp a bit more travel too, to allow for backer boards front and rear.
You can slip a horizontal board behind the vertical part being routed to act as a backer board to eliminate blow out at the back of the routed cut.
snip
It is a good jig for guys like me who learn by doing and burn their screw-ups.
<--- BACK TO THE PREVIOUS PAGE
(about all those parts to keep track of) MORE ---->>>>>