When you set up your first shop there's a lot of "shop furniture" (as opposed to "real furniture" aka "house furniture") you need to build to hold machines, tools and "stuff" you acquire as you get farther down the slippery slopes of woodworking. And that, as Martha would say - is a good thing. There's lots to learn and making shop furniture is a great way to apply what you think you've learned from magazines, books, TV programs, video tapes, demonstrations at woodoworking shows or your nearest wood working store.
The great thing about making shop furniture is its Low Risk Factor. You can use 2x4s and shop grade ply and not any of your growing stash of "real wood" - maple, cherry, walnut, ash, birch . . . That gives you the opportunity to try a new technique or two and if you blow it you can always run down to The Borg and get some more 2x4s. AND if it turns out nice then it can be the prototype for making it again in "real" wood, especially if you used traditional joinery - mortise and tenons, dovetails, finger joints, sliding dovetails etc..
Here's another Quick and Dirty that got away.
I use to do lost wax cast jewelry and kept the equiptment - just in case. So I had an 18" x 22" electric kiln to move around the shop each time I needed more table height space for woodworking stuff - in this case a lathe.. Eventually the kiln ended up back in the corner, up on a large old drawer I'd found and kept because "this could come in handy some day".
I'd made five storage shelves units and, to avoid making the sixth unit I decided to slap together a table for the electric kiln. (I'd done the storage shelves units to avoid finishing up a coopered door cabinet for router bits, which, in turn, was done to avoid hanging the last door on the sharpening station cabinet that was started in an attempt to avoid finishing up my Real Workbench - see a pattern here?) Simple table, 24" wide, 21 inches deep and 34 inches tall. Some 2x4s. some ply, a bunch of pocket hole screws - how long could it take? Cut the stock to approximate length, mill it to get out the twists, crooks, cup, bows and rip to width and cut to final length. Some clamps, a bunch of pocket screws and the base would be done (see "A" below).
Simple right? Thirty two pocket screws, a piece of ply screwed to the legs and it'd be done. WRONG! While functional, it'd be UGLEEE. Why not make it a little more delicate looking and add a few curves?
There'd been a recent thread on The Wreck about loose tenons, and since I'd acquired the Trend M&T "system" and hadn't really used it yet - well why not use loose tenon joinery (mortise both parts and hold together with a separate "loose" tenon),? Here's the joinery.
Note to self: Cut the mortises BEFORE doing any shaping. Not doing so is one of the many disadvantages of winging it when making things.
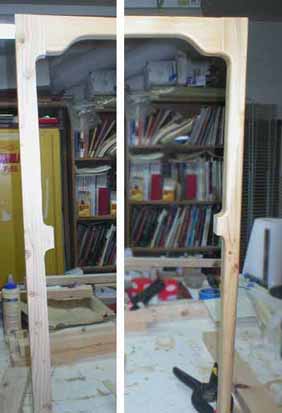
Once it was all dry fit together it looked pretty clunky. "Hmmm - if I put an S-curve here and a corresponding semi-circle there and tapered the legs below this point ...?" Some lines to cut close to, some bandsawing and some time on the oscilating spindle sander and I had "B" which looked a little nicer. But the hard edges were now a bit harsh. Tried softening the hard edges with a half inch round over bit and that soften things up a bit, though not enough.
Got out the block plane and the Micro-Plane "files" and started rounding and shaping things, then hand sanded 'til it looked closer to right (see "C")

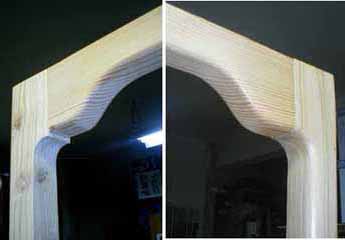
Here some of the real thing - left side still with the hard edges and the right side with the edges softened and joints "blended". The right leg has been tapered, the left hasn't been tapered yet. Should've mitered the apron to leg joint as well to have nicer grain flow - maybe if I make this one in "real wood" I'll try that.