Exploring the DOMINO's Features
Naturally, still thinking "Biscuit Joiner" (and not having read The Manual - all FIVE pages of it - with three of those pages being "Do Not Operate While Standing In Water, Do Not Drop This Tool on The Floor - or Your Foot, Do Not Attempt To Use The Dust Extractor As A Bong - It Is Plastic And IS Combustible, etc.) I foolishly assumed that the Stepped Fence Presets were for Bottom of Fence to Centerline of Mortise.
WRONG!!!!!!
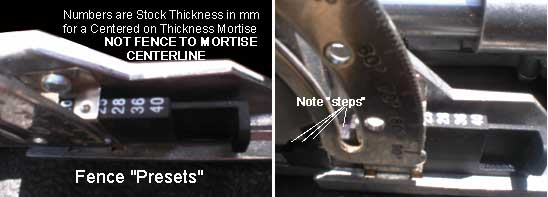
The DOMINO has seven presets for centering the mortise BASED ON SPECIFIC STOCK THICKNESS - for stock thicknesses of:
14mm ( 0.315" or about 5/16" - 0.323") - this one's "unofficial" but available anyway.- just slide the stepped "preset" back past "16" to get the fence to mortise line down to 7mm and center the mortise on 14mm thick stock
16mm (0.623" or about 5/8" - 0.625")
20mm (0.787" or about 25/32" - 0.781")
22mm (0.866" or about 7/8" - 0.875)
25mm (0.984" or about 1" - 1.000)
28mm (1.102" or about 1 1/8" - 1.125)
36mm (1.417" or about 1 27/64" - 1.422")
40 mm (1.575" or about 1 37/64" 1.578")
Unlock the fence, raise it up, "click" the Stock Width into the "selection window", lower the fence to the "step" and you're ready to go! AND - if you write the setting number on your part you can reset the DOMINO to repeat that mortise at any time later. The ability to record the settings for a particular mortise, with just a few numbers can come in REAL handy later. You can write them in ink somewhere where they won't normally show on the finished piece but can be seen if you know where and what to look for. Will get to THAT little convenience later.
Now these presets have at least two nice advantages (I may find more as I use the tool.)
1. If you mill your stock to one of the eight presets, and use the corresponding preset - you get a mortise centered on the thickness of the part - regardless of which face you place the fence on.
Read that again. It says "IF the stock thickness matches the fence preset - YOU CAN'T SCREW UP - the mortise will ALWAYS BE CENTERED ON THE THICKNESS no matter which face of the stock you set the fence on!"
Read THAT again.
2. If you want a "reveal" between the two parts you want to Loose Tenon together you KNOW where the centerline of the mortise will be on the narrowest part and you can pick the preset to mortise centerline on the other part which will give you the "reveal" you want. Using the "presets", the distance from fence to the mortise centerline is HALF THE VALUE SHOWN ON THE THICKNESS GAUGE.
SO - let's look at the Centered On The Stock Thickness thing first then we'll get to the "reveal" thing.
I need to note that the DOMINO will do three mortise lengths, set by a Selector Switch on the top of the unit, which lets you "dial in" either No Slop, 6mm of Slop or 10mm of Slop, regardless of the "thickness" of the mortise. This will make sense after you've examined the following illustration.
You've got FOUR Bit Diameters (with corresponding tenon thicknesses) and SEVEN Offsets From Reference Face to Mortise Centerline. That gives you SEVEN Presets to Centerline for each Bit Diameter - or TWENTY EIGHT built in, easily repeatable mortise locations - and that's without using the other two "Slop" options.
Back to the illustration. Ignore the "Left/Right" location of the mortises and focus on the STock Thickness and the distance "Top Face Reference and the Mortise Vertical Centerline".
NOW are you starting to see the power of the DOMINO and it's Presets Options?