And the answer to this week's cliff hanger question is ....

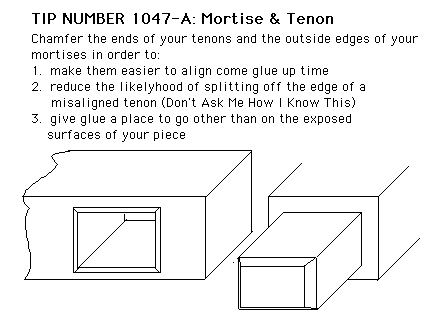
This also works for pegs, but don't chamfer the edges of the holes if they're going to show.
Speaking of pegs - BEFORE I did this glue up I drilled the holes in the legs for the pegs which will hold the stretchers to the legs. I used the drill press to make sure the holes were square to the face of the legs because if they weren't things would get messy later. I used two brad point bits and a backer board since I'm going with through pegs (more about why TWO brad point bits later)
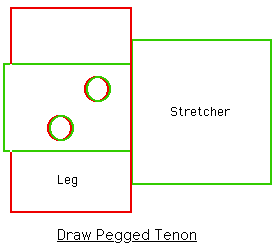
After drilling those holes I put the stretchers on the legs and, using the same brad point drill bit, place it in the holes in the legs and marked the center of the peg holes onto the tenons of the stretchers. Took the stretchers off, found the "center marks", circled them with pencil and back to the drill press.
Placing the brad point just behind the "center marks" by maybe 1/16", I drilled all the peg holes in all the stretcher tenons. Now when I drive in the chamfered pegs the very slightly offset holes in the tenon will draw the tenon tighter agains the mortised leg - a draw pegged joint I beleave it's called. Because the pegs go all the way through the mortised legs they can be driven out should the bench have to be disassembled.
Now on to more about pegs. Did you know that the round dowel rods you bought aren't normally round - or the diameter they're marked?
I bought "half inch diameter" walnut and maple dowel rods for the pegs for this bench. Since they're going to be "draw pegs" and the ends will show their diameter and the diameter of the holes they'll go in have to be the same. No problem - half inch dowels, half inch drill bit - what's the problem?
Well, first off, the "round" dowels weren't actually round AND they weren't actually "half inch diameter" either. The walnut dowel diameter, according to my digital calipers, ranged from 0.484 to 0.490 or about 1/64th inch less than the nominal "half inch". The maple dowel went the other way, 0.508 - 0.512 NOT 0.500.
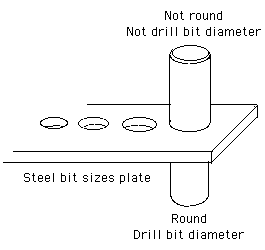
I'd seen a "dowel plate" in the new Lie Nielsen catalog that would solve the problem. Chamfer the end of the dowel and drive it through the hole in the steel plate to make it round and the hole's diameter. "That looks like the plastic drill bit guide The Handyman Club sent me. Hey, I've also got a metal one - and I know exactly where it is - for a change (the wonders of a wall hanging tool cabinet with drawers)."
NOTE: The LN "dowel plate" - at $45 US - has 1/8 - 5/8 inch holes, but only in 1/16th inch increments. The drill gauge plate is in 1/64th increments. Driving a dowel to shave off 1/64th of an inch ain't hard. Driving one to shave off 1/16th of an inch seems like it would be tough.
Lo and behold - there's a 31/64ths hole which comes to 0.484 inches. Got out the brad point drill bit set and sure enough, in addition to the 1/2" bit there's a 31/64th bit. Cut off pieces of the dowel stock to a little longer than I needed, chamfered one end and pounded them through the metal drill bit guide. Amazing- round dowels of a specific diamters. Neat!

Now go and find your metal drill bit guide and put it where you can find it the next time you have to do some doweling that'll show.
