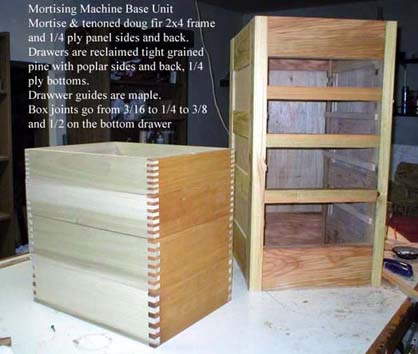
Evolution of a Four Drawer Base Unit for a Mortising Machine - page 2
Needed some drawer faces so with a little scrounging around I found two pull out shelves salvaged from an old desk that was going to be thrown away. While sanding out the dings and scratches in what appeared to be oak I discovered it was a veneer over old growth pine. Cool! Poplar drawer sides and box joints seemed like a good idea. BUT - since the drawer heights were graduated, why not graduate the finger sizes? So the top drawer has 1/4" fingers, the next drawer has 3/8" fingers, the third drawer fingers are 1/2" and the bottom drawer has 5/8" fingers. Didn't plan that at all - just became obvious once the drawer faces were set in their openings.
Did the drawers' joints, made sure they fit then took them apart and routed dadoes in the sides for drawer guides. Held each one up in the drawer opening and with a single bevel edged marking knife, scribed lines into the front uprights/stiles for the dadoes for the draer guides. Because of the M&T joinery, I could then take everything apart, align the front left and rear left uprights togehter and route the dadoes for the drawer guides - no measuring necessary. Did the same for the other side's guides and reassembled things yet again.
Ripped some maple for the guides and sanded the front corners rounded to make putting the drawers in a little easier. Tapped them into the dadoes, checked how the drawers rode on them, did a little shaving and sanding here and there and the hard part was done - still all just dry fit. Slick.
A little teak oil on the drawer fronts and sides, some shellac on the rest of the piece to keep goop out of the grain and it was onto the top.
Here's what I had at that point ( and yes, I know there's only one "w" in drawer - I used Norm's spelling )
Since the things was solid wood up to this point I decided to go with a solid wood top. Had scored a ton of either black or honey locuts. It's a really strong, tough wood so it seemed a natural for the top. Needed 17 inches of width and finding it in one 10 inch wide by 3/4" by 10 foot long board was impossible. This stuff had knots scattered strategically throughout the board. Should have taken what I needed from several boards but what the heck - "it's just shop furniture".
Because the top was solid wood - and locust, honey or black, has a tangential shrinkage of 7% I'd need bread boarded ends. Besides, a 3/4" thick top just didn't look beefy enough, given the way the rest of the cabinet was constructed. So off to the lumber store (Southern Lumber to be specific) to find some wood. That's how I discovered the joys of working with mahogany - African mahogany in this case - one inch thick and two inches tall.
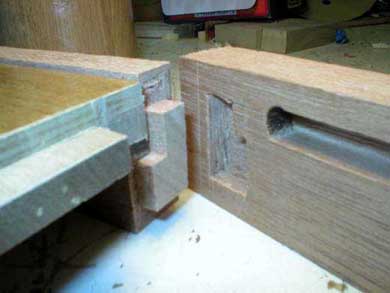
And this is where things got a little tricky. The breadboard ends can only be attached at the center so that the top can expand and contract within the groove in the face piece. The side frame has to move with the top AND stay vertically aligned with the breadboard ends. A simple mortise and tenon joint would take care of the vertical alignment but the mortise would have to have some left/right slop to allow for the expansion and contraction of the locust. So here's what I came up with. The mortise is wider than the tenon but the tenon's outsid shoulder should hide the mortise when the top shrinks. No glue on these M&Ts
Note #3 - Mahogany is a joy to work with. It cuts, chisels, pares (sp?) and scrapes like a dream! I wish I'd done the whole piece in mahogany. With a little grain filling and some hand rubbed shellac it comes out really nice looking too.
The only thing left was to decide on drawer pulls. Had some padouk - nice bright cinnomany color that was just too loud for this piece. Had some suitably sized pieces of rosewood but it would be too dark. Maybe some lumpy pieces of the outside of a madrone burl? Nope - just didn't fit with all the straight lines and flat surfaces. Have some tiger redwood that would go with the reddish tones of the piece - but it's too soft. Eventually settled on maple.- subtle grain, pleasing contrast without yelling "Hey! Look at me!" Ripped some pieces, routed a concave lip and cut four pieces.
Only AFTER cutting them did it occur to me to graduate them in keeping with the graduated drawer faces. Ripping small parts is a no-no for me. Just to hard to control the piece while making the cut. I don't like my fingers that close to sharp spinning carbide and hate dodging small missiles traveling at Mach One. What to do? And that's where the 12" disk sander came in. Scribed where I wanted the pulls to end and, being careful not to sand my fingers, just sanded to the line.
Note #4 - When installing drawer pull DON'T assume that the center of each drawer will fall on the same vertical line! Find the center of the top and bottom drawer openings, mark them, install the drawers, clamp a straight edge joining the top and bottom center points and run a light pencil line onto the face of each drawer. On each drawer pull, SCRIBE a line on the back and bottom edges in the horizontal center of the drawer pull. Put a small notch on the top at the back. Use these to line the pull up with the "center line" on the drawer. Now you only have to decide the vertical postion of the pull.
Note # 5 - The Kreg Pocket Hole Jig comes with special vise grips which have swiveling disks in place of toothed jaws. When installing drawer pulls with flat fronts these vise grip things are perfect for holding the guide in place while you drill holes from the inside of the drawer into the back of the drawer pull.
on to page 3 of the Evolution of the Mortising Machine's Four Drawer Base Unit ----->