We've got a micro controller and a bunch of things to stick on it - that sense things - and can do things. So?
Well, let's start with a really simple example and then get to other slightly more complicated ideas.
Olive wood is notorious for misbehaving - bark inclusions, internal checks and cracks - and it's proned to self destructing.
You're turning a vase or hollow form out of olive wood - and as you do, cracks start appearing. But you keep turning, hoping you can turn passed them. And you get lucky and some are turned away.
Thinner walls are less proned to cracking - so you turn the walls thinner. That helps - for a while - and then the cracking and splitting begin again. At some point you give up and kiss the piece off as a Learning Experience.
But the natrual opening in the piece are kind of interesting - nature's version of piercing.
You hold the opening of the piece up against a light to see how many of the cracks and splits go through the sides of the piece - and light streams out some of them. A little more work with a scalpel and some could be cut through the wall and light could come out of them.. If this piece could be INTERANALY lit - this might be an interesting piece - a problem turned into a feature.
Incandescent light means HEAT - and wood and heat don't go together.
But what if you can have light -WITHOUT heat? LEDs put out light without much heat - and LEDs are everywhere these days. Put a battery powered LED inside. And if that LED were to flicker? A lit candle INSIDE a wooden piece? A Paradox Piece!
Here's the finished piece - and details including what's INSIDE the piece. The LED connected to a micro controller is programmed to randomly get brighter and then almost turn of - flickering - just like a candle. A yellow LED adds to the flickering candle effect.
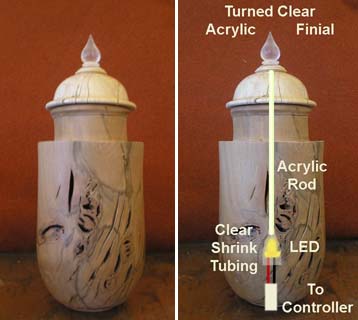
Here's the LED connected to a battery powered micro controller.
And here's the Sketch (program) for a "flickering candle".
// OldestSister1 sketch
//
#define Candle 7
// tells the computer that the LED "candle" is connected to Pin #7
int Ontime =0;
// tells the computer to reserve some memory for the OnTime of the "candle"
int Offtime = 0; // tells the computer to reserve some memory for the OffTime of the "candle"
void setup()
{
pinMode(Candle, OUTPUT);
// tells the computer the "candle pin", Pin 7, is for OUTPUTTING to the "candle"
}
void loop()
// what comes next will run continuously until the power is turned off or a new program is downloaded to the Micro Controller
{
Ontime=random(20,500); // varies Ontimeof the "candle" randomly from 20 to 500 thousandths of a second
digitalWrite(Candle,HIGH); // tells the "candle" to turn on (HIGH)
delay(Ontime);
// keeps the "candle" ON for some random time ONTIME
Offtime=random(20,250); // varies Offtime of the "candle" randomly from 20 to 500 thousandths of a second
digitalWrite(BWLED1,LOW); // tells the "candle" to turn off (LOW)/
delay(Offtime); // keeps the "candle" OFF for some random time OFFTIME
}
Simple program, simple wiring - and you've got a flickering candle to put jnside a piece.
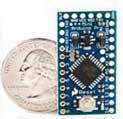
BUT LOOK AT THE SIZE OF THAT THING!
Relax. That's just one version of the Arduino Micro Controller. It's size makes it easier to connect up stuff while you're prototyping an idea. Once you've got hings worked out you can solder your wires to a much smaller version - that can run off hearing aid batteries. Here's the Installed Application version of the Arduino - at actual size. Put two pennies end to end on this thing and that's about long and wide and thick this thing is. The power of an early MacIntosh computer - smaller than your thumb - that you can program - to do STUFF.
The power of an early MacIntosh computer - smaller than your thumb - that you can program - to do STUFF.
A flickering candle - big deal!