For the Holey Mackeral, the first decision SHOULD BE grain orientation. Unlike single axis turning of round cross sections, this multi-centered fish will have two Show Faces and two edges. So before locating the two centers on either end, I SHOULD HAVE decided how I wanted to orient the pair of centers on either end of the blank. I DIDN'T, initially, as you will see in some of the photos in just a bit.
If I placed the pair of centers on a line paralleling the grain of the wood as shown in (A), the grain would show as more or less straight, more or less parallel, lines. That would emphasize the long thin streamlined look mackerals have
But if I placed the pair of centers on a line square to the direction of the grain as shown in (B), the grain on the "show faces" (sides of the fish) would look like concentric ovals. That would make the fish look fatter and not very mackeral like. It'd be a subtle but noticable thing.
What I'm trying to get acrossed is that attention to details, some not so obvious, can result in a better, more coherent piece. But you have to pay attention
So I went with (A)
(AFTER trying an aribtrary orientation of the the centers - AND - pairs of centers like (B). With multi-center turning, it's very easy to THINK you're doing "A" when you're ACTUALLY doing "B". This is why I put together these NOTES TO SELF and stored them on my woodworking site where I can't lose them. If you find the notes helpful - that's icing on the cake.)
NOTE TO SELF:
Put a dab of RED fingernail polish on each of your CORRECT centers AFTER making a tapered hole at each one with an awl.While the fingernail polish is still wet, redo the awl hole. This will make it much easier to see - and - the awl holes will help align the points on the drive and tail center easier. The piece will be mounted and remounted multiple times during its turning, These little "tricks" make things easier.
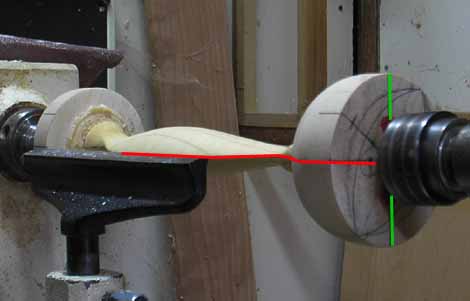
The next thing I needed was to draw lines on my round blank where the two arcs will intersect - the RED line in the illustration below.
![]()
At least one of the two RED lines will have to be redrawn several more times as the piece is turn.
By setting the top of the too rest to the same height as the center of the drive center or tail center, the top of the tool rest can be used to draw a RED line on the piece during the turning.
Now multi-center turning involves imbalance - and on a small lathe - vibration. The vibration is worse when you're turning a wet/green blank. The more wet wood you can remove while still turning on the blank's center the less vibration you'll have when turning off-center. By penciling the profile I'm working towards onto the round blank and turning pencil lines at key control points on the profile I could use a narrow parting tool to cut down to the desired depths at each control point.
While still between centers, I could turn down to the desired major profile, removing about half the green wood BEFORE starting the off-center turning - and thus significantly reducing the off-center vibration that's coming.
The major axis centerline is redrawn using the top of the tool rest before the pair of arcs are turned towards their intersecting at this line.
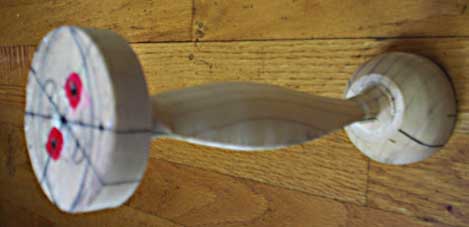
NOTE THE EXTRA MEAT LEFT ON THE ENDS OF THE BLANK.
THIS REDUCES THE CHANCES OF THE PIECE SNAPPING.
Now some turners will turn one arc to completion, then change to the other center and turn the other arc To The Line. I'm not that confident - so I creep up on it, turning some from one pair of centers and then some from the other, checking often to see where a little more wood needs to be removed..
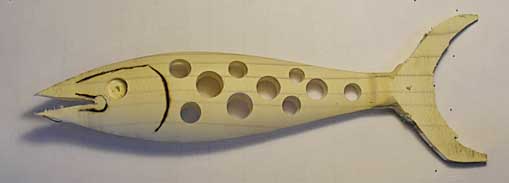
When I'm done turning the mackeral's body - I have this.
 \
\
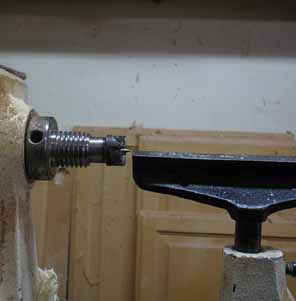
And now I need to drill some holes - on a curved surface - with NO flat surfaces to rest on the drill press table. THAT presents a problem - actually, TWO problems. First, how do you keep the drill bit from wandering as you begin drilling? Second, how do you keep the hole thing from rocking as the hole is drilled? If you want the Illustrated Step By Step - With Text Description - details CLICK HERE
While I've still got flat surfaces on the ends of the piece it's back to the bandsaw to cut the mouth opening - then a little pyrography - and I've got this.
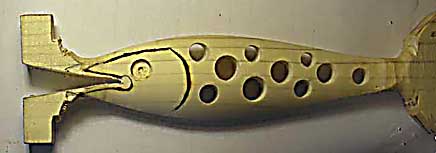
After working out the shape of the tail it was back to the band saw and a little work on a belt sander for some blending the mouth and tail to the rest of the body.