A New Surface Treatment Tool For Turners - Laser Engravers
Turners have come up with all sorts of ways to add patterns and textures to their turnings - rotary tools with burs and bits, pyrography pens, wood vaporizers / branders, sand blasting, etc.. Now there's a new "surface treatment" tool available to woodworkers - LASERS - speciifically LASER ENGRAVERS.
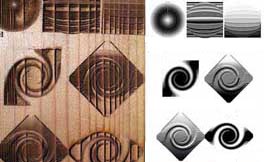
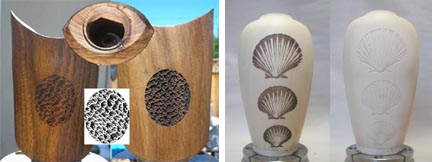
Laser engravers are becoming more accessible and they offer a lot of interesting "surface treatment" possibilities. They can "print" images on just about anything. They can pierce/cut through just about anything. AND - they can do LOW RELIEF 3D "carving" using "grayness" to determine the depth of cut - the darker the gray - the deeper it burns.
Here are some examples of low relief 3D "carving" done with a laser engraver - on/in wood - flat wood AND curved wood. You'll be seeing more about them and how they were done later.
Interested?
The intent of what follows is to give YOU an overview of a laser engraver and what it can do - AND - provide you information that should flatten you learning curve enough to get you started - successfully.
Here's the Table of Content for what we'll be covering. Go through it all and THEN you can get to specific topics as you need them later.
1. The basics of the Epilog MiniHelix Laser Engraver
The moving parts and the Control Panel
Three of the Modes - Printing, Cutting and 3D Gray Scale Low Relief Carving - with the basics of how each works
Lasering on a CURVED surface - radius to working width
2. Corel Draw - the computer interface between your artwork and the Epilog MiniHelix Laser Engraver
Importing and Placing Your Image in Corel Draw. How to get your digital artwork into Corel Draw & how to locate it on PAGE
Page Set Up - overview of the options of the "printer driver" interface that controls what the laser will do
The GENERAL Set Up Options - how each one affects the lasered results - with suggested values
The ADVANCED Set Up Options - Basic, 3D and Stamp
3. A DIY Jig - for holding your turning for lasering - that you can thread your scroll chuck onto
4. How to create and save abstract Gray Scale images in PhotoShop that you can use for Low Relief Laser Carving
An overview of what you CAN do - images and some actual lasered wood samples
Using the Gradient Tool and Filters with plenty of HOW and WHY details
Image Resolution and its effect on the look or your lasered results
SAVE AS file formats and their affects on your lasered results
5. How about some actual examples?
6. Tips for making Clean Up easier - lasers do BURN and create smoke
7. Tips for finding images on the web that can be used for Gray Scale Low Relief Laser Carving