With the turning done, it was time deal with Before You Can Do This, You Gotta Do That. Think of that puzzle with the nine numbered tiles and the ten spaces. To move any one of numbered tiles, you must move several, or ALL, the others tiles.
The piece can't have its finish applied until the hole in it for the eyeball to look out of has been drilled.
To know where to drill the hole for the eyeball to look out of I need to know where the eyeball is going to be.
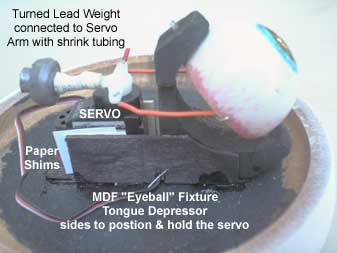
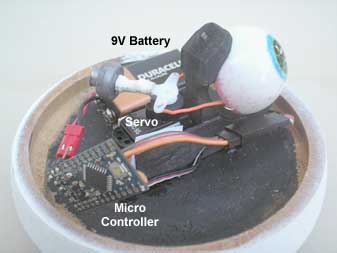
To know where the eyeball should go I need to connect it to the servo and hold the two together in a fixed position - relative to each other AND relative to the piece in which both will go - along with the micro controller AND the battery.
And before all that - I need to make the inside of the turning flat black so even if the "eyeball to hole" fit has some room around it - you won't see anything inside the piece except flat black.
The Flat Blackening was easy.
Connecting the servo box to the eyeball fixture was solved with some cut up of Tongue Depressors, some glue and some paper shims to snuggly hold things in postion - yet leave the option of removing and replacing the servo if it for some reason croaked. Leaving options open is usually a good idea - like insurance. May never need it, but if I do need it . . .
(Note: Turns out leaving the option for removing - and replacing - the servo was a stroke of genius.
In THIS case, the need to replace the servo - was the result of - a stroke of idiocy. I don't know what
Idiot Move I used to kill the orignal servo - but I managed to accomplish THAT feat! Thankfully replacing
it was easy - and I was only out nine bucks - the price of the replacement servo.)
The weight on the back of the servo's arm that amplifies the moving servo arm's affect on the whole piece was done with shrink tubing and some CA glue. Shrnk one end of the tubing to the lead weight and the other end to the back of the servo arm.
Getting all the parts inside the piece and working out where they should go - while allowing the lid to fit on the base - AND postioning the Eyeball in the hole in the lid - required some guessing - some eyeballing if you will. Then the Leap of Faith - CA glueing the Eye Ball Fixture to the base. Guessing wrong would take a bit of work to recover from.
With the eyeball in place I could measure up from the base to the center of the eyeball. Put the lid on the base -using an adjustable square. Mark the location of the center of the eye and head for the drill press to drill the hole.
Drilling a 1" diameter hole with a forstner bit - in a tapered cylinder presents a challenge.
With the hole drilled it was Did I Guess Right Time - fitting the lid to the box - to see if the eyeball would line up with the hole.
IT DID! - sort of. A little work with a rat tail wood rasp tune the fit. A little more flat black on the newly exposed wood around the inside of the hole and it was time for doing the outside finish - finally.
Covered the "innards" with saran wrap to protect them from the white spray paint I was about to apply. Stuck the box lid to the box and shook and shook and shook the gloss white enamel spray paint can.
And then it occured to me.
I was about to glue this thing together - with spray paint!
THAT WOULD NOT BE A GOOD THING! (to paraphrase Matha Stewart)
A piece of 12 gauge copper wire as a spacer / gasket avoided THAT problem
Took a bit of self control to do LIGHT COATS - rather than spraying heavy to get things white right away. Prior bad experiences with heavy coats - sagging, running, etc.,- kept me doing light coats - four or five light coats - 30 minutes apart. Patience is a virtue - and not a bad virtue to have when spray painting.
For some reason, this spray enamel did not like wood that had CA glue in or on it. The paint would pull away from the CA glued areas.
#@!*&^*%!!%#
Let it dry well - and did a bit of 220 grit sanding in the trouble areas. Then went a got a can of Zinser's 1-2-3 white primer. It sticks to EVERYTHING.
Couple three light coat of white primer, a little waiting - and then two or three light coats of the gloss white enamel. That all went well. A bit more patience to allow the paint to dry and it was on to the experimental finish.
A good spray of 3M's Super 77 spray adhesive and then pouring the glass Bead Blasting beads over the piece produced a dusted with frost look to the piece. And when the light hits this surface just right - the surface glows, or nearly gleams - like sunlight off fresh powder snow. Very interesting look - that's almost impossible to capture - with a still image. The piece looks like it's been dusted with Crystal Meth. How something so evil can look so pretty is paradoxical - so appealing and yet so dangerous.
Here's a shot of the final piece - with a detail that hints at what the surface finish looks like. And yes, I know - the piece is tilted. There's a reason for that - which I mentioned earlier - rocking movement.
.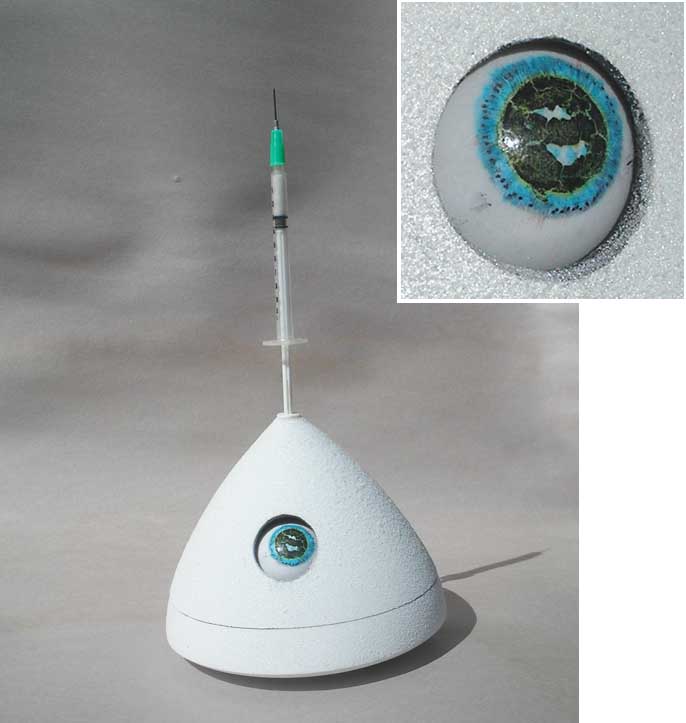
From the base to the tip of the needle, it's 10" tall and 5" in diameter. And fortunate for me - the needle is squared off rather than sharp - it's actually made for injecting wood glue into tight spaces- like when repairing chairs. I put a lot of time and sweat into this piece - didn't need to add blood and tears to the effort. Needles creep me out. Dull needles are safer to work with - but still creepy.
This piece took more time, effort and thought - than any piece I've done so far - except for The Elegant Tight Rope Walker The message - On Demand Drug Rehabilitation Treatment - drove me inadvertently into working on it 'til 3 or 4 am, getting a few hours of restless sleep as ideas for the piece spun around in my head - and then getting up and working on it for another day - or so. I found myself grinding my teeth, clenching my jaw, my shoulders and neck got tight and my appetite got turned practially turned off AND I became easily irritated by minor things. I was developing the physical and mental characteristics of a speed freak. That's when I stopped work in this piece and went visiting friends, having friends over and spending time with my grand kids - a week long Mental Health Break. I could do that. Speed Freaks can't.
I've shown this piece to about 20 people and described the piece to a dozen more. Almost to a person, each had a story about a friend or relative who had a drug problem - and the grief that problem wrought on others who cared about the addict / abuser. And all agreed that it would be far better to make On Demand Drug Rehabilitiation Treatment available - than to send addicts to prison - or have them die - or cause someone else to die.
My hope is that this piece disturbs - and provokes conversation - and perhaps action - to get On Demand Drug Rehabilitation Treatment one day closer to actually happening.
Now to answer the question "Why is it TILTED?" - watch the YouTube video of this thing - in action (I've done a version with a sound track - but can't figure out how to get that on YouTube).