Spindle Turning Practice? Skew It!
Now I’m betting that “kiln dried” douglas fir studs and redwood 2x4s aren’t the best stock from which to cut blanks for spindle turning practice. However, if you can turn beads, coves and ogees in fir or redwood, I’m guessing that cherry, walnut, maple and mahogany would be a breeze.
So - with plenty of doug fir scraps and some redwood 2x6 cut offs - I embarked on some skew chisel (?) practice. Magic wands are always popular with kids, especially with the new Harry Potter book just being released. They provide plenty of opportunities for learning spindle turning, plenty of opportunities to experience “catches” and to become familiar with inadverent spiral cuts.
Starting with 1 1/2” square by 13-15” long blanks, I penciled diagonals on the ends, and used an awl to mark the centers. Discovered that end grain, especially in soft woods, is not easy to make a hole in - where you want it. The awl point would follow the edge of the harder grain and meander off center just a little.
Note to self: When marking the center of an end, use a medium sized sewing needle stuck in a piece of wood.
To get the roughing to round started I block planed off the edges of the turning blanks. Curlies are easier to clean up than a TON of small chips. Placed one end of the blank on the four spurs end and the live center at the other and tightened things up. Set the speed to about the middle of the 1200 rpms range. Set the tool rest as close to the blank as I could, a little above the blank’s center line and turned the blank to check for clearance. Discovered that my “center” points weren’t centered.
Note to self: Being off - even just a bit - on marking the centers of a blank - will give one an “opportunity” to try some eccentric turning. Makes roughing to round more of a hands pounder.

Picked up my only roughing gouge, half inch, got it’s bottom rubbing on the rotating blank (actually it was bouncing) and slowly pulled it away from the blank ‘til the bevel began rubbing and then rocked the cutting edge into the wood, making sure the gouge’s sharp corners stayed away from the wood (learned not to do that earlier on the UniMat). Began sweeping the gouge along the blank and rotating it slightly as I went to use most of the cutting edge rather than just it’s low point.
I’ve done some wood carving with gouges and Nora Hall’s “broom bristles” analogy - “Cut along the SIDES of the bristles from the “handle end” rather than into the ends of the bristles” applies to spindle turning as well. Start at the right third of the blank and rough cut to the right. Rather than cut back to the beginning of the rough in the gouge was liften, returned to the starting point before started the next rough in pass to the right.
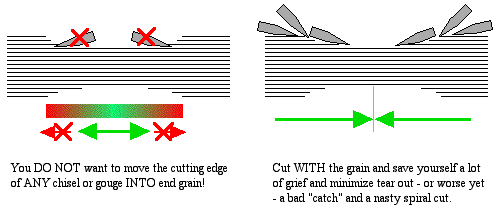
Move to the middle third of the blank, start at the left and cut to the right - towards the part I'd already worked on. At the left end of the blank start an inch to the right of the left and and cut to the left - from wood to air rather than from air INTO the end grain. Then it’s back to “right to left” to continue roughing the blank to round.
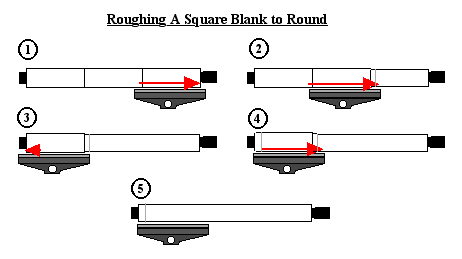
Periodically, set the bottom of the chisel on the piece and run it along the top. If it rides smooth you're done with roughing round. If you feel the tool bounce you've still got some flat spots left to remove.