After months away from the lathe mentoring a newbie building a floor to ceiling linen cabinet, impending Christmas prompted a return to turning.. And what better way to start than an with an ornament - or three. There's some blending of curves used in bowls, some hollowing through small openings and - my favorite - some delicate spindle turning. The black on the right one was an accident - the effect of friction on delicate rims - while polishinhg a wax finish (Liberon white carnuba). Maple and Yellow Heart -these were fun to turn

Conveniently, my neighbor pruned her silver maple trees and I got some of the wood to play with - green. Green is fun to turn - shooting streamers all over hell and getting ankle deep in them. But to really do it right you have to turn rough - then wait, and wait, and wait - and still maybe have the piece crack and split - before finishing it. I just don't have that kind of patience, or discipline. Ordinarily I'd do some weed pots to get back into the swing of using a gouge rather than a skew. But, just to do something different - if you add a finial a weed pot can become a ring holder.
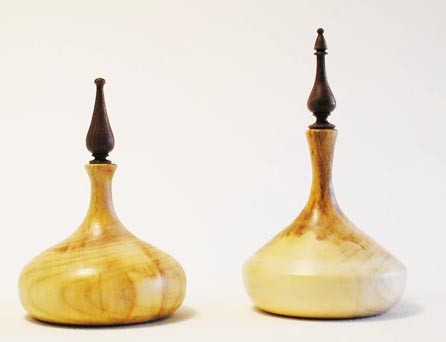
Alas, since these were turned from green wood, the one on the left developed some cracks. So - I HID THEM - using FIRE! (Click HERE for more)
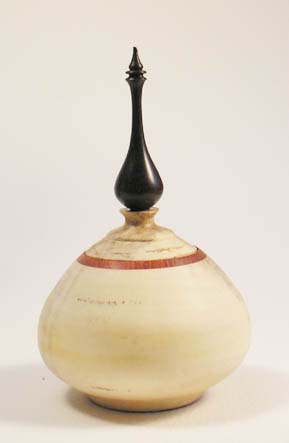
Since green wood is free - and usually in larger pieces than dry, and sometimes relatively expensive, wood, it's great to try something risky. If things don't work - well it was free wood. I'd seen Cindy Drozda demo making an inlaid rim lidded box and I'd done a set of illustrated step by step instructions. This FREE green wood would be a great way to try and apply what I theoretically knew how to do. And, while the piece of wood I used wasn't the prettiest wood or the best wood to use, it was good enough to do a Proof Of Concept piece. AND it'd be an opportunity to to try a Drozda-esque delicate onion shaped finial. While Cindy makes the finial an integral patt of the lid, this wood wouldn't lend itself to that so the finials are from dry Blackwood.
This mext one was a Close Enough piece - it has a decent inlaid rim - and the general shape of the piece I saw Cindy demonstrate turning. But - there are quite a few things that need refining - the bottom of the "onion" needs to be a smaller diameter, the neck longer and more delicate, the "neck" below it needs to be thinner, it's edge where it joins the lid should follow the curve of the lid better and the interface made crisper and cleaner. The blending of the three lower parts should be smoother and the lower curve and the upper curve need some refining.
For a LOT more about Cindy's demo piece that inspired this one - along with step by step illustrated instructions - with notes - CLICK HERE.
With all that practice - with a curved edge 1/2" skew - and a 1/4" bench chisel - not a tool you'd think of using for turning - I decided to do a "jewelry tree" for son Chas's Veronica.
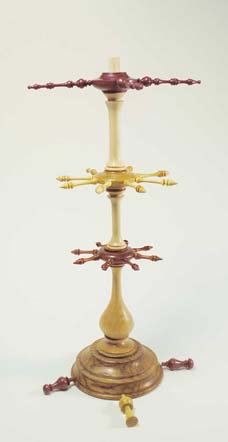
Still have some feet and a lid pull to turn for a jewelry box from last Christmas - and I'm running out of time. For mre about the jewelry tree and some pictures of the finished piece CLICK HERE.
Tis the season . . .
BTW - I finally got around to making a "light box" and some poster paper for seamless backgrounds, along with actually using a tripod to take these pics. Think I'll use a gray background next time.
This one's made using 1/2" PVC pipe and some plastic fluorescent light diffusers along with a pair of goose neck lamps. The side frames are glued together, the connecting pieces of pipe acrossed the front and back are left without glue in order to store this thing flat when not in use.
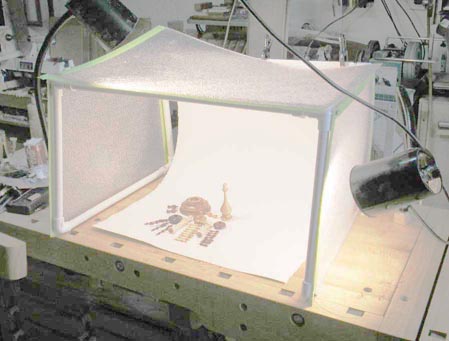
Getting decent shots of your turnings typically end up with bright spots on the piece (how many depending on how many lights you used) which are kind of distracting, often hiding stuff you want to show or washing out details. And having a Wall Meets Floor line behind your piece visually breaks it up - a No No. Buying one of these things, or making one will take your photos of pieces you've done up a notch or two - no Hot Spots and no Wall Meets Floor line. Thanks to gentle cajoling by Jamie D. at WoodCentral's turning forum I finally got around to making a light box just for photographing my turnings.
Here's more details about the one shown above.
NOTE: The plastic diffusers are pretty brittle and tricky to cut. Make the "frames" first and then Sharpi pen their outlines onto the diffuser sheet. Put masking tape on BOTH sides of where you will cut - or more accurately - scribe the plastic. With a utility knife, scribe rather than cut the plastic - in four or five passes to get a relatively clean edge.
NOTE: To avoid confusing your camera, and get truer colors - or more easily adjusted in PhotoShop - use the same TYPE of bulb in all light fixtures - DayLite, SunLite, Soft White etc.