(this page is under construction and eventually will have a start to finish description of the process I went through - from idea to "plans" to finished and hung cabinet. If you're interested in this type of thing check back in a month or so - end of Feb 2002)
The height of these cabinets was primarily dictated by two things. There's a garage door that sets the top of the space they can fit in. There are surface mounted electrical outlet boxes and connecting conduit that sets the bottom of the space available. The maximum available width was dictated by a circuit breaker box on the left and a tall bandsaw on the right. A 12 inch sliding compound miter saw, which needs a lot of space behind it, took out space behind it.
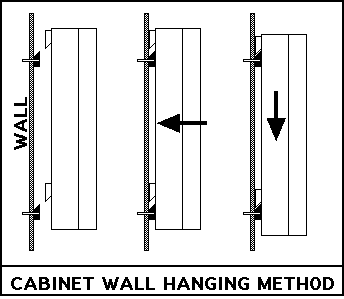
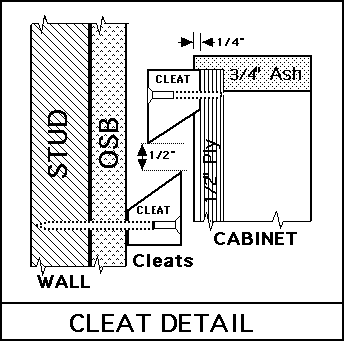
I planned on hanging these cabinets on cleats mounted to the wall. That required leaving room at the top for slipping the cabinets down onto the cleats. So I had to subtract 1/2 inch for clearance.
I'd initially planned on using 1/2 inch plywood for the back of the cabinet, setting it in a 1/2" x 1/2" dado around the back of the cabinet. But, since the cabinets would be pretty heavy I deepened the dado by 1/4" to provide a little more support for the cabinet's top cleat. Right at the start details start dictating details of the plan.
What I ended up with is a cabinet width of 32 inches and a height of 28 inches.
The depth of the combined cabinet/doors is 10 inches, with the cabinet being 7 1/2 inches deep and the doors at 2 1/2 inches deep