Yes, there's more filing to do. The bottom of the allen head bolts have a nice sharp circular edge on their bottoms. The sharp edges WILL cut a nice ring in your saw table's top if you use them without removing those sharp edges. (BTW, I can now identify my X31 in a crowd of X31s)
BEFORE YOU START
Before you put the modified rail setting jigs on your machine
1...Read and understand The Draft Instructions for Setting Up the X31
.....Here's the URL to the instructions which you can download and
.....print, if you haven't already done so. (all one line)
.....www.wood-workers.com/users/charlieb/X31SetUpInstructions1.html
.....At the very least, read the Overview, Tools for Set up and the pages about
.....setting the sliding table.
2...Position the rails so they're centered (very close to the same amount of rail
.....sticking out in front of the saw table as is sticking out the back) and tighten
.....them down securely to the support bracket. If the rails are not centered on
.....the saw table one end will be "heavy" and the other end "light", causing
.....the "light end" to want to sit high.
.....The jigs are great at holding things UP and not so good for pushing
....things DOWN, so get the rails pretty well centered on the saw table
....(thanks to Stephen Gaal for pointing this out and saving others some frustration)
3...Remove the cross cut fence and the "hold down assembly"
4...Position the sliding table so the back lines up with the back of the saw table
5...It's advised that you have an "assistant" (spouse, strong kid, friend) available
.....because you may have to move the rails and the heavy large sliding table
.....in order to get the jigs installed. It is possible, by using your hip and knee,
.....to move the rails around to mount the jigs by yourself. But it's a lot easier
.....if you have a helper/assistant.
GETTING THE JIGS ONTO YOUR X31
You're about to make a leap of faith because you're about to lose your current sliding table settings. The fact that you've got the jigs probably means you're not satisfied with them anyway so JUMP!
BUT FIRST - remove one of the miter slot bars and test the fit in your miter slot. On '99 and later models it should fit loosely with maybe 1/32 inch of "slop". Don't worry about the "slop", it's not an issue once you've tightened the knob which holds it to the jig. On '95 and earlier models it should fit snug but should slide without having to force it.
OK, now let's jump.
Check and make sure the rails are locked down onto the rail support bracket then ...
loosen bolts "1" & "2" and if you can, nows the time to get your assistant. Slide a jig onto the upper rail, align the miter slot bar towards the miter slot and - with help, move the rail around until the miter slot bar slips into the miter slot. The knob on the miter slot bar's bolt should be loose at this point to provide some movement to help align things.
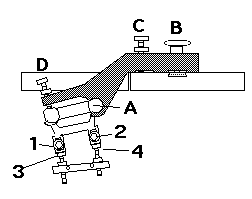
Now the scary part. You may have to lower the the adjustment bolts "3" & "4" in order to get the miter slot bar into the miter slot. This is where you'll lose your existing settings.
Press on!