Now that we've got an idea of WHAT a Micro Controller is and what some of its add on components ARE, and what they CAN do - let's get to HOW to make them work together to actually DO things. This is where things can get kind of tricky. You have a bunch of places on the Micro Controller you can connect things to and you've got a bunch of things you can connect to the Micro Controller. In order to have a "sketch" (computer program) do what you want it to do - "sense" something and then "react" to it - it has to be told which pins to listen to and which pins to send messages to.
So here's an idea for a Modular System that could be used to Pick One From Column A and One (or more) From Column B, MENU. It shows you what connects to what - and the name of the "sketches" that go with them . Hook things up, load the corresponding "sketch" routines, cut and paste them together and have everything work - without learning to program (THAT will come as you play with the Arduino and start tweeking these starter "sketches").
Here's the first Menu idea - with components - wired up for prototyping using a plug in breadboard - and some jumper wires. Breadboard prototyping lets you plug components into it and then plug jumper wires from components to pins on the Arduino using jumper wires - no soldering required. Quick way of connecting parts to the Arduino and testing how your "sketch" works,
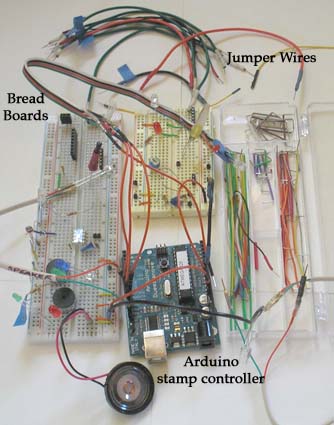
That's the Diagram. The ACTUAL putting things together isn't quite as neat and clear. Here are a bunch of components, a couple of breadboards and two types of jumper wires. Things get a little messier when you get to ACTUAL.
Here's an overview of the idea for this Plug 'n Play use of the Menu Idea to add a bit of dynamism to a piece. The idea is to create pieces that look like a normal, static, turned piece. But, with the use of SENSORS, the piece can detect a change in its environment - a change in its "visual field" - a change in what it is literally feeling - a change in what it's "hearing". And when it "senses" a change in its environment - it can REACT to that change - with sound - with light - with movement - often WITHOUT any physical contact between the piece and the "viewer / participant" in this Interactive Dynamic Piece.
What I HOPE to do is put together a set of information that will permit anyone to pick a Sensor and an Action (Reaction) to make her/his piece into an Interactive Dynamic Piece - assuming you've got on of the several versions of the Arduino "contrikker". Hook up the components to the Arduino, connect the Arduino to your computer via a common USB cable, open the components' software modules, cut and paste them together and "download" the resulting "sketch" to the Arduino. Then, if all goes well, have them work together - the first, second or third time ( when you try something new and unfamiliar it often takes several tries before you succeed).
So that's the idea - a fairly simple, easy to use, Mix & Match, Plug 'n Play "micro controlled" method of incorporating sound, light and movement into a piece - which can then interact dynamically - WITH you - or someone else.
That's the Goal. But Reality has a way of presenting unforseen "challenges" - as I soon discovered.